2.) Using the groundscale from your ruleset and the map scale, draw a box around the area you want to use for your battlefield. In my case, I am using a 4x6 table, and the black block marks the area I want to use for my battlefield. I then broke up that grid into smaller grids to help me draw the major terrain details as accurately as possible. I had 18"x12" paper, and I drew in the coastlines, roads, and elevation changes, using different colors for each
(that was a bit more organized than necessary).
Monday, January 9, 2012
Bunker Hill, part 2
This post will get you from the basic map to the pre-flocking stage for the layout.
1.) Choose the rules for your game. In my case, I like the rules published by the Canadian Wargamer's Group in Habitants & Highlanders. Picking the rules sets the groundscale - in H&H, 25 yards is 1 inch on tabletop.
3.) Fit up the tracing paper as you draw features that cross between pages, and mark each page for a grid - I used A-D and 1-4.
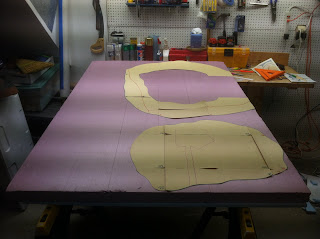
4.) Lay out all of the pages to check that you have everything placed right, then start from one corner of the table and start cutting out the outermost line, adding your grid numbers to each piece cut out, then working to the next, next, next, etc. This is again more organized that some of you might choose to be, but it made sense to me.
5.) Cut the shoreline in the blue foam bottom layer. I have some landing beaches on the short edge of the map that I cut with a shallow angle, but most of the banks are cut at a pretty steep angle - something like 75 degrees. This is because I want to distinguish between the landing beaches and the rest of the shorelines. My tool for cutting the foam - a hacksaw blade. I find that I have more control with it than a hot wire, and the mess is really negligible.
6.) Glue down the blue foam bottom layer. I used a construction adhesive made for foam.
7.) Cut the elevations, using the grid sections you cut out before. I used 1/2" thick foam for the bottom layer, but I wanted to really show the elevations for Moulton's Hill (30 feet) and Breed's Hill (60 feet), so I decided to magnify them by using 1.5" thick foam for Moulton's Hill and two layers of 1.5" thick foam for Breed's Hill. This scaled the heights to the figures more so than to the ground scale, but we of course do the same thing with roads, bridges, buildings, etc and I like the visual effect - it should give the players a sense of the terrain that played a role in the battle.
8.) Shape the hills. I wish I could tell you that I had a single perfect method for cutting the hills, but I actually used everything I could think of. I started with a saw, but finally settled on a wire brush, and then used an electric sander with a drywall screen to smooth things out, and a foam sanding block for more smoothing. The mess took quite a while to clean up, and I made sure to do this while my wife was away for several days...
9.) Add joint compound or spackling to smooth the banks. I actually added this to the various slopes too, but later had to remove that - I'll get into that in another post when I get to flocking...
10.) Just to see a bit of what the final product will look like, I laid out the works and some troops.
Next post, flocking...
Subscribe to:
Post Comments (Atom)


No comments:
Post a Comment