Sunday, January 15, 2012

Bunker Hill, part 3

Flocking via a vinyl grass mat...


I started with a 50x100 inch vinyl grass mat from Woodland
scenics, and after spending $32 for the material at my local hobby shop and carefully cutting out my roads, shorelines, etc. I came to the frustrating decision to remove the mat because nothing I tried could make it actually stick to my contours. I should note that I did not have a proper heat gun and that the temperature in my garage was in the 40 degree range.


Too, something I really did not consider to be a significant problem turned into one - the way that I was installing the mat gave it no stretch, so I had problems forming the grass mat to my hills.


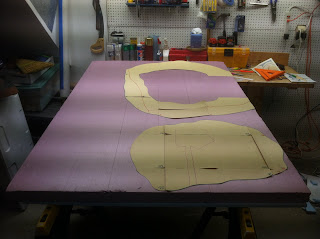
Below are pictures of the grass mat process from it's start to the "last straw" issue that made me pull it all up. - my inability to shape this material around my hills. That all said, I kept a big piece of the gass mat to experiment with after I pick up a heat gun.


Next post - flocking, resin, and pot toppers...

Thursday, January 12, 2012

AAR - Fire and Fury, January 10

We had a great game of Fire ad Fury, set up by Wayne, using his really attractive 10mm GHQ ACW armies.  Here is an after action review written by John Snelling . . .

New guys are being attracted every time we play on Tuesday nights at World's Best Comics, which is great.

It was a long time since I've played F and F and really forgot how quick units get into action more on that later. Accouple games of Wings of War lost one and won one they were fast games.

It's good to see Rob planning to come by and run an ACW ship game - WOW that's been a long time since I've gamed ACW ships decades ago. It should be really nice.

  Action at Green Castle scenario by Wayne (Dewayne) Hill
The Union really got the jump on the Rebels but the Rebels stubbornly fought back.

A standstill. No side giving ground despite numerous charges. No give and take just stand your ground and trade volley after volley.

Union General Turnista was carried off the field due to exhaustion. Then Union General Dietrick was wounded severly when his horse was shot and went down, after a long struggle he finally freed himself only to be kicked in the groin by the horses last gasp of life. 


What would the Union do?

Without any hesitataion Col. J. Dent arose to the occassion. The word spread from brigade to brigade, regiment to regiment, man to man that the Col. was a fightin man's man. Gaining courage, like strong fingers turning into a steel fist, the Union soldiers charged again and again into a hailstorm of hell to emerge victorious. The stubborn and equally courageous rebs could stand no more and were routed from the field. 
 Triumph on the field. Soldiers carried Col. Dent on their shoulders praising him for his wisdom and bravery. Later Col. Dent was promoted to General by the President.

Monday, January 9, 2012

Bunker Hill, part 2

This post will get you from the basic map to the pre-flocking stage for the layout.
1.) Choose the rules for your game. In my case, I like the rules published by the Canadian Wargamer's Group in Habitants & Highlanders. Picking the rules sets the groundscale - in H&H, 25 yards is 1 inch on tabletop.

2.) Using the groundscale from your ruleset and the map scale, draw a box around the area you want to use for your battlefield. In my case, I am using a 4x6 table, and the black block marks the area I want to use for my battlefield. I then broke up that grid into smaller grids to help me draw the major terrain details as accurately as possible. I had 18"x12" paper, and I drew in the coastlines, roads, and elevation changes, using different colors for each
(that was a bit more organized than necessary).


3.) Fit up the tracing paper as you draw features that cross between pages, and mark each page for a grid - I used A-D and 1-4.
4.) Lay out all of the pages to check that you have everything placed right, then start from one corner of the table and start cutting out the outermost line, adding your grid numbers to each piece cut out, then working to the next, next, next, etc. This is again more organized that some of you might choose to be, but it made sense to me.

5.) Cut the shoreline in the blue foam bottom layer. I have some landing beaches on the short edge of the map that I cut with a shallow angle, but most of the banks are cut at a pretty steep angle - something like 75 degrees. This is because I want to distinguish between the landing beaches and the rest of the shorelines. My tool for cutting the foam - a hacksaw blade. I find that I have more control with it than a hot wire, and the mess is really negligible.
6.) Glue down the blue foam bottom layer. I used a construction adhesive made for foam.
7.) Cut the elevations, using the grid sections you cut out before. I used 1/2" thick foam for the bottom layer, but I wanted to really show the elevations for Moulton's Hill (30 feet) and Breed's Hill (60 feet), so I decided to magnify them by using 1.5" thick foam for Moulton's Hill and two layers of 1.5" thick foam for Breed's Hill. This scaled the heights to the figures more so than to the ground scale, but we of course do the same thing with roads, bridges, buildings, etc and I like the visual effect - it should give the players a sense of the terrain that played a role in the battle.

8.) Shape the hills. I wish I could tell you that I had a single perfect method for cutting the hills, but I actually used everything I could think of. I started with a saw, but finally settled on a wire brush, and then used an electric sander with a drywall screen to smooth things out, and a foam sanding block for more smoothing. The mess took quite a while to clean up, and I made sure to do this while my wife was away for several days...
9.) Add joint compound or spackling to smooth the banks. I actually added this to the various slopes too, but later had to remove that - I'll get into that in another post when I get to flocking...
10.) Just to see a bit of what the final product will look like, I laid out the works and some troops.
Next post, flocking...

Tuesday, January 3, 2012

Bunker Hill

My "theme" game for the Williamsburg Muster will be Bunker Hill. Given that I am using a battle that predates the "Wars of 1812" it is a bit of a stretch, but it does feature Americans and British troops at least.
I want to use this blog to walk through my process to create a gaming layout for a convention game. I try to create games for our conventions that go a considerable step beyond the standard club game, trying to give the many gamers who travel to our convention something special.
Here is the wikipedia entry for Bunker Hill - I am using both of the battle maps from there to make my gaming table.
I have several rulesets that I want to playtest with, and the coming month should see several playtests. I am set on a 25 yards per 1 inch groundscale, with 1 figure equaling 25 men, and an effective musket range of 75 yards.
Now for the setup:
My layout will be 4'x6', fitting cleanly on a 5x6 convention table with 6" to spare on each long side for the players to put their dice, tape measures, rosters, etc. Conveniently, a 4x6 layout also fits perfectly in my SUV for the drive to the convention.
I have a base of 1/8" thick masonite because the insulation sheathing that I am using to construct the terrain is somewhat fragile, and the masonite will help to prevent any major damage. Too, I can paint the masonite where necessary to provide the illusion of depth to the "water" that I add to the gameboard.
In my next post, I'll show how I cut the foam and build the terrain layers. Here is a teaser picture of the gameboard after the first night's efforts.